Multi-SSI
The Multi-SSI panel is accessed via the g5 User Interface. You must have a case node selected for it to be active.

It will list all the panels in the current case with an associated SSI file.
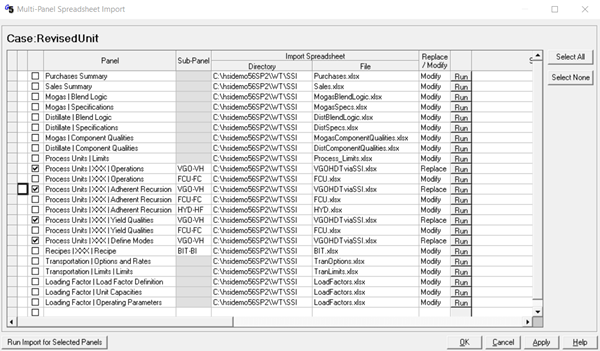
You tick the data sets that you want to upload, setting Replace or Modify as needed, and then press the “Run Import for Selected Panels” button. (You can also run panels individually by clicking the “Run” button on each row.) You might, for example, use this to set up a planning case by loading the set of purchases, sales and unit availabilities for that scenario. This is also a convenient point for updating process unit representations. As you can see above, I have selected all the VGO-VH panels: Operations, Adherent Recursion; Yield Qualities and - new in v5.7 - Define Mode.
I created my unit SSIs by exporting the data for an existing unit into a workbook, putting each type of information on a separate sheet (I could have appended the sections one after another on the same sheet, but I find the resulting need to scroll down past each set of notes annoying).
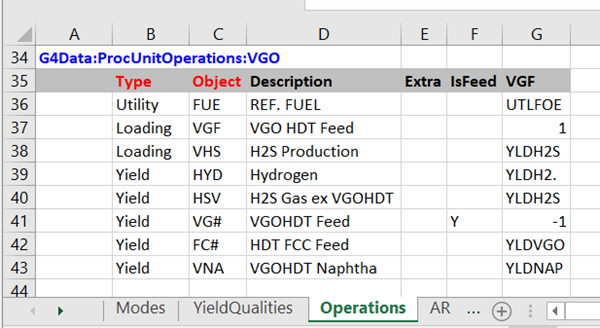
Then I made my changes– renaming the mode and adding some new PUPs.
Press the “Run Import for Selected Panels” button and …..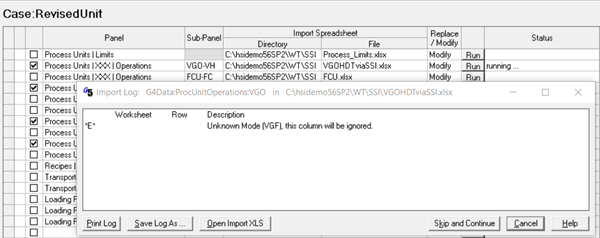
It doesn’t work. Lots of times panels could be loaded in any order but in this particular example the Operations can’t be updated because the new mode hasn’t been defined yet. I need to import the SSIs that define new codes – Define Modes and Adherent Recursion - before I can load the Operations panel. I could just run it twice as the new objects would exist the second time round – or I can get clever with the sorting. An Advanced Sort by Sub-Panel, then by Panel happens to put things in a useful sequence.

so that the updates are all successful.
WorkFlow
WorkFlow is a tool that allows you to script the use of GRTMPS tools, including SSI. This is useful when you want to control the order, as necessary for the process unit example above, since the workbooks will be processed in the order you list them. Workflow is also very convenient for loading data from multiple workbooks into the same panel. For example, if you have an SSI workbook for each process unit and want to include the limits then you need to load each into the Process Limits panel. Purchase and Sale imports can also only be done in the one central panel. If you have data for different accounts --- or periods, or locations – in different workbooks then you need to load them one after another. The panels, however, only have space to remember a workbook name, making it difficult to make it clear what needs to be done.
A Workflow script can be set up to document and automate the job. Workflow is opened from the Tools menu. Start with File | New to initiate a script.
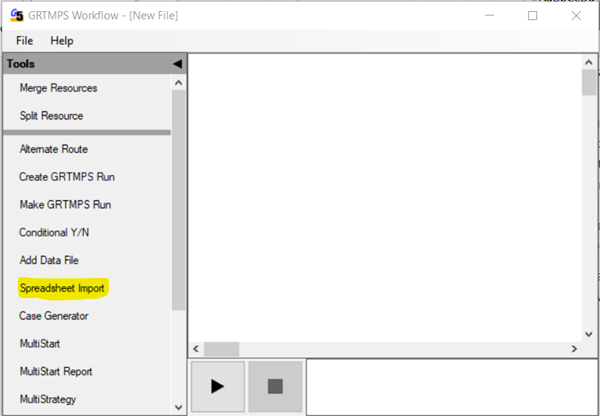
Click on “Spreadsheet Import” and then in the drawing area on the right.
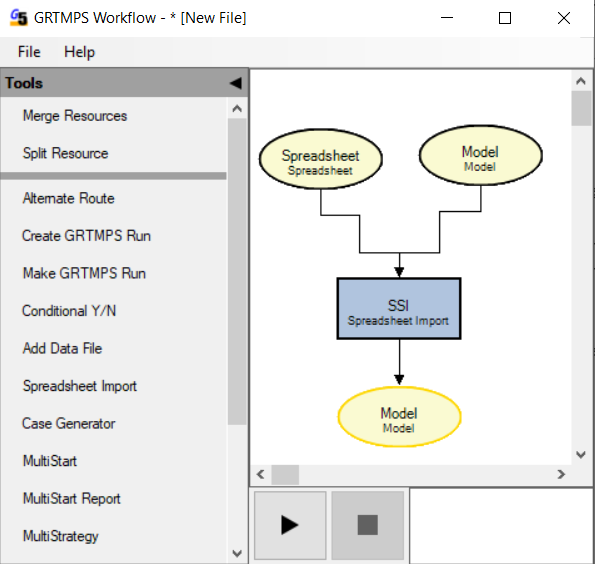
Right Click on the Spreadsheet object to select the SSI workbooks.
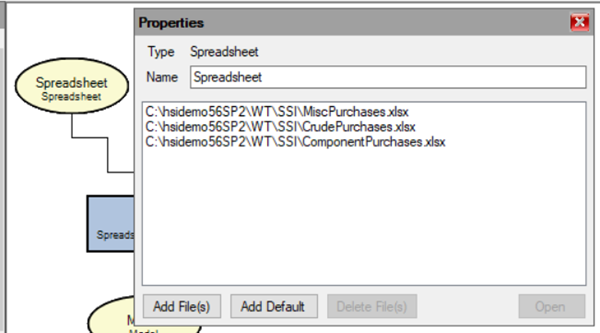
You don’t have to indicate which panel is to be loaded; that is determined from the “G4Data” labels. The workbooks are imported in order. (There is, at present, no way to change the order except delete and select again.) If there are multiple SSI sections in any of the files, they will be imported in the sequence that they appear. Edit the Name field to document what data is listed. Below you can see that the object is now labelled “PurchaseData”. Each of the workbooks has the data for one of the purchase acccounts. Changes will be saved when the dialogue box is closed by clicking on the red x.
Right-click on the Model object so you can select the destination for the import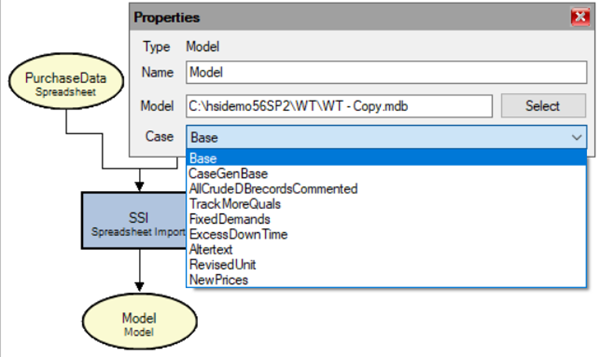
The case must already exist. If it does not, close the Properties box without selecting anything and start again once the case has been created.
Finally, right click on the SSI Task box to set the Mode to Modify or Replace.
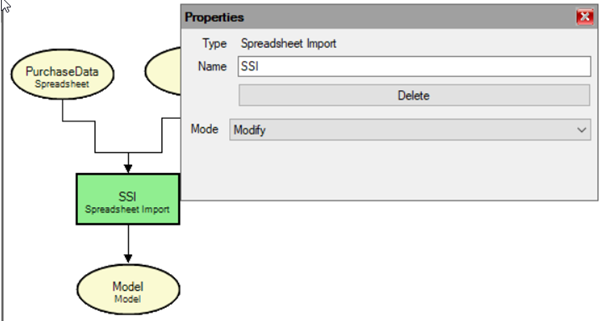
All of the workbooks in the associated Spreadsheet object will be read in the same mode. This must be “Modify” if there are multiple G4Data sections for the same panel – otherwise each Replace would delete the previous load. It can be convenient, however, to start with a Replace to clear out obsolete data. If you need to do a mix of Replace and Modify, then create two linked Import tasks. (Use the Merge Resource option to make the output Model object of the first task also the input Model object of the second.)
To run the workflow, click on the play button. Each object/task will be highlighted in the graphic display as it runs, and a summary of each step printed in the status box.

The model can be open while the import is running. However, it is smarter to have all the panels closed to avoid losing changes or overwriting what you have just imported.. If an affected panel is open, you will need to navigate away and re-open to refresh the display.
If any of the workbooks has an error, then the Workflow will abort.
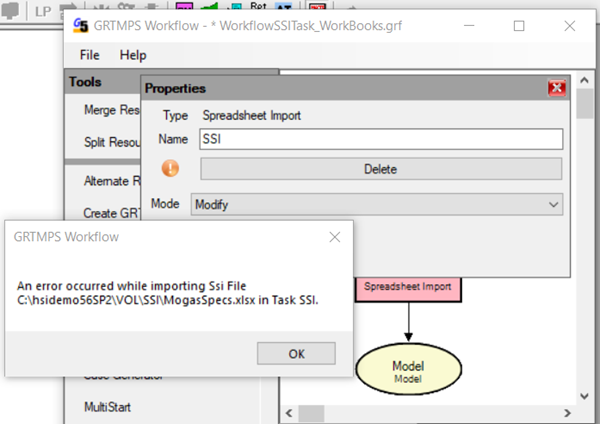
The failed task will be highlighted in Pink and will have an Orange marker on its Properties dialogue that you can click to re-read the error messages. Load the problem file manually via the g5 interface to obtain the detailed list of bad records. (Note that a number of improvements were made to the error handling and loading facilities for version 5.7; earlier versions may simply freeze on encountering bad inputs.)
The completed Workflow can be saved, file extension .grf, and re-used. Edit the object properties to apply it to a different model or case. This Workflow could also be extended to run an optimization on the newly updated case – then a Multi-Start or a Case Generator (or both!), followed by the Report Generator with a multi-case template to give you a comparison report - possibilities to be covered in future notes.
7th September 2021.
You may also use this form to ask to be added to the distribution list so that you are notified via e-mail when new articles are posted.